Internet speed and internet usage monitoring are necessary these days. In this article, we want to explain how we can do that in Windows 10 and later.
Let’s start.
How to Monitor Total Internet Usage in Windows?
Let’s find the Settings button on the Start Menu and click it. (Like figure 1)
To have more information about the Window Settings, you can visit this page.

Click the Network & Internet item on the Windows Settings window now. (Figure 2)

As the first result, we can see the total internet usage of our operating system. (Figure 3)

How to Monitor Internet Usage of a Process in Windows?
Let’s see how we can check the data usage of an application in the Windows OS. Click the Data Usage button on the Network & Internet window. (Figure 4)

There is a vertical list (of processes) on the opened Data Usage window. It shows us the total internet usage per system’s application. (Figure 5)

As the second result, we can see all the processes’ data usage on this page. We can also scroll the page down to see the other applications too.
How to Monitor Internet Speed in Windows?
Let’s write the ‘task manager’ phrase to the search area in the taskbar (Figure 6). Then, we have to click the Open link when the Task Manager application appears.

Now, we can have the all details of applications if the Task Manager window is in the More details mode. Otherwise, we can switch to that mode by clicking the link at the bottom of the page. (Figure 7)

Also, we have to bring the Network column up if it does not exist in the opened window. We can do this by right-clicking on the column’s headers. (The opened context menu in figure 8)

Well done! You have the live speed of processes on the Network column now. These rates are the internet speeds for the applications that have global connections.
But, let’s explain a better way to have more professional information about our system’s internet data usage.
How to Monitor Total Internet Speed and Usage Using Smart Net Manager?
Smart Net Manager (SNM) is perfect for managing internet usage.
Internet Usage Overview
Let’s find the SNM’s Icon in the notification area. Then, we have to right-click it and select the Main Panel Item. (Figure 9)

Select the Network menu in the opened window. (Figure 10)

You can see internet usage sizes now. (Find the red rectangles in figure 10)
But, if you are willing to have more information, you can still click the Internet Usage button. (Figure 10)
Details of Internet Speed and Usage
The Internet Usage window has two tabs. The first one (Online Monitoring) shows the internet live speed of sent/received data. (Figure 11)

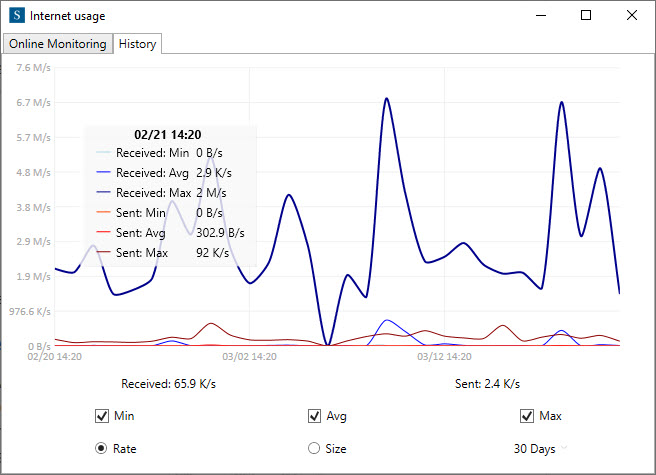
Also, the second tab (history) displays the history of our internet usage in various periods. (Figure 12)

Furthermore, Smart Net Manager shows us the history of internet speed. It also displays the minimum, average, and maximum values. (Figure 13)

TCP Connections Monitoring
To monitor the TCP connections of the operating system, click the TCP Connections button on the Network panel (Figure 10). The opened window shows us valuable information about every opened TCP connection of the operating system. (Figure 14)

In addition, there are loads of columns on this window that get us a broad view of connections.
For example, we could have:
- Process name
- Local/remote IP and port
- Received/sent data size
- Last connection time
- The geographical location of the remote IP
- Time zone of the remote IP
- Country name of the remote IP
Click the Location link to see IP’s location on the google map. (Figure 15)

Geographical Map of Internet Connections
It’s possible to have a geographical map of the operating system’s connections using Smart Net Manager. This map also shows countries’ internet usage (Figure 16). Click the Geo Map of Connections Item on the Network Window (Figure 10) to see this window.

How to Monitor Internet Usage of a Process Using Smart Net Manager?
Let’s see how we can get the complete information about the internet that a process has used.
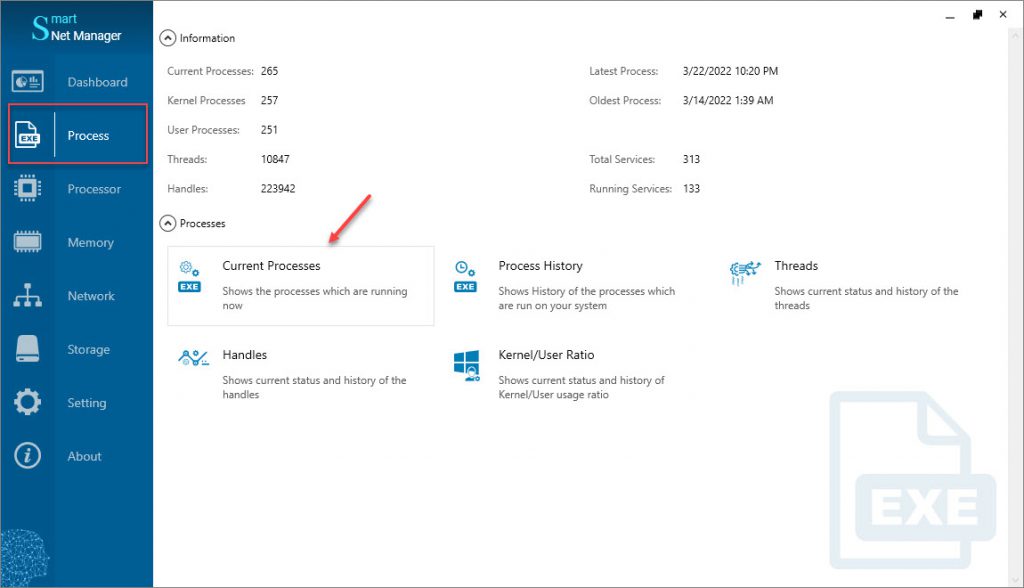
Open the Main Panel of the SNM app, like figure 9, and select the Process Menu. Then, click the Current Processes Item as figure 17.

Select your desired process and click the History button (Figure 18). In this example, we have selected the chrome.exe process.

This History page has various tabs. We can see the internet usage of our selected process (chrome.exe in figure 19) on the Activity tab and the Network Usage section.

In addition, there are loads of information about the chrome.exe process’ connections (our selection) on the Network tab. Look at figure 20 for more details.

So far, we could access the history information of a process. Now, let’s know, what is the best way to manage the internet connections of an application?
TCP Connections of a Process
Click the Current Connections button on the Process window (Figure 18). There is the live connection information of our selected process on this page, as in figure 21.

Live Internet Speed of a Process
Now, click the Status button at the bottom of the Current Processes window (Figure 18) to see the live bandwidth of the selected process (Figure 22).

As you see, Smart Net Manager helps us to manage our system’s internet usage.
We pride ourselves on our Smart Net Manager software product. It is helpful to have professional information about the Windows Operating System. You can try it using this link. Or, You can also visit our website to have more details.
